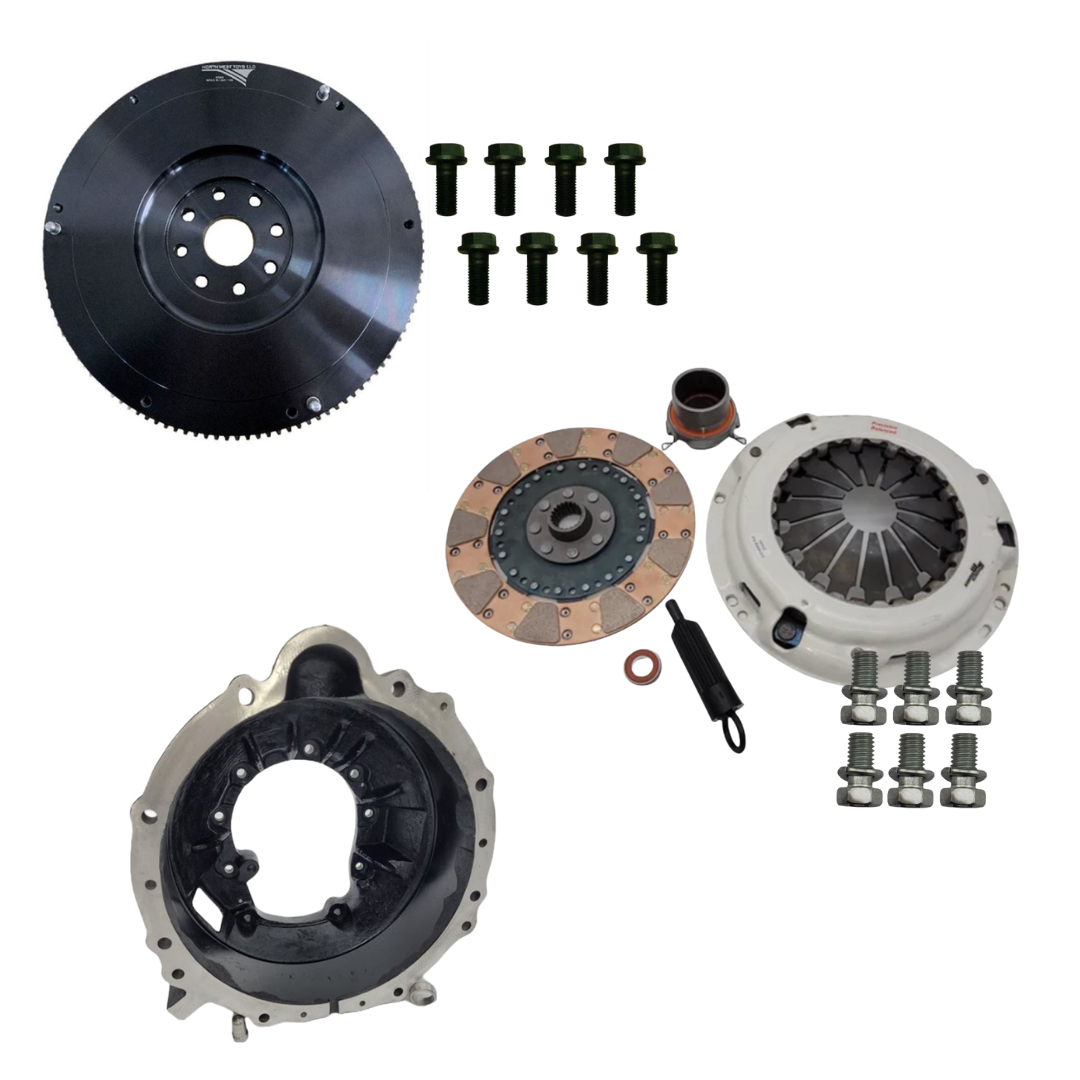
UZ Manual Conversion Package for 1UZ 2UZ 3UZ - Flywheel, Clutch, & Bell Housing
UZ Manual Conversion Package for 1UZ 2UZ 3UZ - Flywheel, Clutch, & Bell Housing
*Please select your options below to configure your package and view pricing before adding to cart.
Couldn't load pickup availability
SKU:575101
Your UZ swap just got simpler. This all-in-one UZ-FE Manual Transmission Conversion Package provides you with the exact components needed to bolt a W-series or R-series Toyota manual transmission behind your 1UZ, 2UZ, or 3UZ engine, offering proven reliability and tunable clutch performance to match your build.
This package combines the core drivetrain components necessary to mate a UZ engine with a Toyota manual transmission. Whether you’re building a weekend crawler, daily driver, or competition rig, this kit streamlines the parts selection process with tested compatibility and simplicity of bolt-together assembly.
Note: The Bundle & Save discount will be applied when you add it to your cart.
Package Selections
Billet-Steel Flywheel for UZ Swaps
Our billet-steel flywheel is a new 27lb unit that bolts directly to the 1UZ, 2UZ, and 3UZ crank snout – without modification or spacers (like a good flywheel should).
The flywheel is five pounds heavier than a stock cast-iron flywheel, expands low-RPM torque, and improves your ability to maintain engine speed while driving and crawling.
NWT’s flywheels are designed, machined, and built in the USA.
+ OEM Flywheel Bolts
Clutch Kits
The NWT Dual Comp Clutch Kit for UZ Conversion is designed for off-road enthusiasts who seek enhanced clutch pressure without compromising daily drivability. Featuring a hybrid clutch disc with metallic pucks on one side for superior holding power and a fiber lining on the other for smooth engagement, this kit strikes a balance between performance and comfort. Ideal for multi-use vehicles with upgraded horsepower, it offers a firmer feel than stock clutches but remains more manageable than high-metallic options.
- Multi-use clutch for off-road & everyday use
- Metallic pucks for increased holding capacity, combined with fiber-based lining and springs to support smoother engagement
- 385 FT-LB Torque Limit
The NWT HD Dual Comp Clutch Kit for UZ Conversion is designed for more demanding applications, combining a heavy-duty pressure plate with a rigid dual-compound disc, featuring hybrid organic fiber on one side and segmented ceramic on the other. This setup delivers exceptional holding power, capable of handling up to 400 ft-lbs of torque, making it ideal for use with boosted or extreme-duty applications. Engineered to pair seamlessly with our conversion flywheel, this clutch kit ensures durability and reliable performance under high-stress conditions.
- Designed for off-road & heavy load daily use
- The 6-puck design offers a more aggressive engagement, a firmer pedal feel with quicker engagement; you may experience slight chatter in first gear or reverse
- 400 FT-LB Torque Limit
The NWT Extreme Duty High Torque Metallic Clutch Kit for UZ Conversion is designed for the most demanding applications. This kit combines a heavy-duty pressure plate with a rigid metallic-ceramic disc. Engineered to handle up to 470 ft-lbs of torque, this competition-grade clutch excels in high-torque racing and rock crawling scenarios where standard clutches fail. Its aggressive design ensures reliable performance and durability under extreme conditions, making it the ideal choice for serious off-road and motorsport enthusiasts seeking maximum clutch strength and responsiveness.
- Designed for racing, rock crawling, and high torque applications
- Features a heavy-duty pressure plate with a rigid metallic disc
- 470 FT-LB Torque Limit
All clutch kits include the following components: pressure plate, clutch disk, pilot bearing, throw-out bearing, and alignment tool.
All NWT’s clutch kits are designed & machined in the U.S.A
+ Pressure Plate Bolts
Bell Housing
The Bellhousing Adapter for 1UZ, 2UZ, and 3UZ engines is engineered for Toyota R-series and W-series transmissions. Made from high-quality aluminum, this kit includes the bell housing, front input shaft extension, and pivot mount, ensuring precise fitment. The slave cylinder mounting area is designed with extra height and adjustable positioning to accommodate various slave cylinders. While the mount comes pre-drilled, some trimming, re-drilling, or tapping may be necessary depending on the specific slave cylinder selected.
Installation Instructions
FAILURE TO FOLLOW PROPER INSTALLATION OR BREAK-IN PROCEDURES WILL VOID ANY WARRANTY
Congratulations on your purchase of your UZ Manual Conversion Package. This is designed for installation in UZ-swap rigs, 1989-1995 Toyota pickups, and 4Runners. These instructions are intended to guide you through the installation process, not to be an exhaustive list of what is required for a successful installation. Remember that you are building an engine-swapped rig, so adjustments and modifications may be necessary based on your vehicle or the installation of other products. If you have any questions along the way, please don't hesitate to contact us. We will do our best to assist you through the installation process.
We stand behind what we sell. We warranty our in-house products for 30 days from the date of purchase against defects in materials or workmanship, provided they occur before installation. All products we carry and sell from outside sources will carry the warranty provided by their manufacturers. We do not warranty any product from willful neglect or abuse, and there are no refunds on electrical parts. The consumer must request a return authorization number from us before returning any product. Any products returned will need to be inspected by us. Upon our inspection, if we find a defect, we will either repair or replace the part at our discretion. All returned items must be in new condition and are subject to inspection. If you have a problem with any products we sell, please feel free to contact us, and we will do our best to get you taken care of and back out enjoying your Toy again!
Product and Application Waiver: All products sold by North West Toys, LLC are sold for off-road use only. Any other use or application is the responsibility of the purchaser and/or user. Rock crawling and off-road driving are inherently dangerous activities. Some modifications will adversely affect the on-road handling characteristics of your vehicle. Some changes and installation of certain after-market parts may, under certain circumstances, void your original dealer warranty. Alterations to your vehicle may create dangerous conditions, which could cause serious bodily injury or death. Buyers and users of these products hereby expressly assume all risks associated with any such modifications and use. North West Toys, LLC also strongly recommends that all products be installed by trained professionals only. Please contact us before returning products. Since each vehicle is a custom build, some parts we sell may need to be trimmed or slightly modified to fit your vehicle. You are the final builder of your car. Once a part has been modified, it can’t be returned.
Please read our Warranties and Conditions page before making a purchase. You are the builder and end user of your vehicle and any product you buy. We are not liable for any issues, problems, or liabilities associated with their use. If you disagree with the warranties and conditions, please don’t buy our products.
Tools Required
3/8 drive ratchet
Multiple ratchet extensions
12 mm socket
14 mm socket
17 mm socket
19 mm deep socket
Angle grinder with cut-off wheel
12mm thread tap
Drill
3/16” drill bit
Rubber mallet
Items needed but NOT supplied
Loctite
Isopropyl alcohol
Rags
3vz flywheel bolts- New bolts can be ordered through us if needed
Pressure plate bolts- New bolts can be ordered through us if needed
Block to bell housing lower inspection plate
Thick washer ½”
Installation of Flywheel
Always ensure that the negative battery terminal is disconnected before working on your vehicle. Remove the old flex plate from the crank. There should be 8 14mm bolts that need to be removed. Once removed, the flex plate bolts can be disposed of. With the flex plate removed, a spacer is located behind it. The spacer can also be removed and disposed of.
At this time, check to see if the rear main seal is leaking oil. If so, replace the rear main seal with a new one.
The new flywheel is coated in pickling oil and can be slippery, so be careful not to drop it. Place the flywheel on the end of the crank. The flywheel is designed to be a tight fit over the crankshaft, so it most likely won’t be able to be pressed on by hand. With the flywheel sitting on the end of the crank, install (2) 3VZ flywheel bolts and use them to press the flywheel onto the crank. With the flywheel pressed on the crank, you can back the two bolts out.
Check the UZ starter for proper engagement on the ring gear. The starter gear should engage the ring gear about ½ way into the ring gear.
With the flywheel now installed, it’s time to install the Loctite onto the threads of the flywheel bolts.
Then torque in a star pattern to 65 foot lbs.
Installation of the Clutch kit
Always disconnect the negative battery cable before performing any major work on your vehicle. When removing your old clutch, note which way the clutch disc was facing (spring pack facing engine or transmission). You will want to install the new disc with the same orientation as the old disc you removed. Before installing your new clutch, clean the inner bellhousing area to make sure no debris gets onto the new clutch. Also, inspect the clutch bar for any damage (cracks, excessive wear, etc). Install a new pilot bearing in the crankshaft. Failure to replace the pilot bearing can result in annoying squealing noises, especially when the engine is cold. We supply a new pilot bearing in all of our clutch kits. Place the clutch disc on the flywheel, using the alignment tool provided to facilitate easier installation of the transmission. For V6 clutches, the spring side faces the flywheel. If there is any confusion, refer back to which way the stock disc was facing. Install the pressure plate onto the flywheel, ensuring that the dowel pins in the flywheel align with the corresponding holes in the pressure plate. Verify that the alignment tool keeps the clutch disk centered in the assembly (do not let the tool hang on its own; you need to keep it centered as you install the pressure plate—torque bolts evenly, a little at a time, in a star pattern. If the pressure plate is not torqued evenly in steps, it can cause the plate to warp, which will not be covered under warranty. North West Toys LLC recommends tightening the pressure plate with hand tools only. Refer to the chart below for torque specs. Remove the alignment tool. Replace the throw-out bearing. The throw-out bearing is secured in place with two retaining clips that attach it to the clutch fork. Lubricate all moving parts, including the input shaft, pressure plate “finger” tips, throw-out bearing contact surfaces, etc., with white lithium grease or Anti-Seize. This will ensure smooth performance and engagement of the clutch. 11. With the new throw-out bearing in place, slide the transmission onto the engine, being extremely careful not to let the weight of the transmission hang on the clutch disk. This can cause severe damage to the disk. With the clutch disk aligned adequately during installation, the input shaft should not require any force to be applied to install it. Rocking the transmission or turning the output shaft as you install the tranny may help if it doesn’t go in all the way. DO NOT USE THE BELLHOUSING BOLTS TO DRAW THE TRANSMISSION AND ENGINE TOGETHER! This can result in serious damage, especially to the new clutch or the thrust bearings inside the engine, and should not be necessary if everything is properly installed and aligned. Reinstall the slave cylinder and other components you may have removed to gain access to the clutch. If needed, bleed the clutch hydraulic system according to the repair manual. Road test the vehicle, and avoid aggressive driving for the first 500-750 miles. Proper break-in procedure is crucial to the long service life of your new clutch.
3VZ Flywheel Torque 65 FT-LBS star pattern
3VZ Pressure Plate Torque 11-15 ft-lbs star pattern
Installation of the Bell housing
Our bell housings are designed to connect a UZ block bolt pattern to the R150F manual 5-speed transmission found behind the Toyota 3.0 and 3.4 V6 trucks and 4Runners. The bell housing is manufactured with two predrilled and tapped holes for a slave cylinder. We have found that not all slave cylinders are aligned in the same way in this area, so this is now oversized to allow you, as the builder, to custom cut, drill, and tap the holes you may need for proper slave cylinder alignment. Having to cut and re-drill these two holes is considered normal and not cause for alarm.
With the transmission sitting on the transmission jack, remove the throw-out bearing and fork. Next, remove the nine bolts that hold the bell housing onto the transmission. 2 dowel pins locate the bell to the tranny, so a small amount of pressure can sometimes be required to separate the bell from the case.
Now that the tranny is bell-free, it’s time to place the 1UZ bell on the tranny. Ensure the dowel pins are lined up in the new bell and install bolts to secure the bell to the transmission. Install the new pivot ball or reuse your old pivot ball, and install a thick washer underneath the pivot ball. Install the clutch fork and throw-out bearing. Install the tranny onto the motor. This will place the clutch fork in its resting position and under riding tension from the clutch pack. Place the slave cylinder up at its mounting location and push the slave rod into the slave as far as possible. This is the riding position of the slave. Mark the inside of the mounting holes with a Sharpie. Remove the transmission from the rig.
Remove the fork and throw out the bearing from tranny. Now, using a drill and a 3/16” drill bit, drill out the holes that you marked with the Sharpie for the slave mounting location. Now, use a cutoff grinder to remove the necessary material to position the slave mount correctly, allowing it to work with your clutch fork. Once the required material has been removed, install the fork and throw out bearing back on the transmission. Using your tap, re-tap the new holes you have.
Now it’s time to place the tranny back up against the motor and tighten all bolts to hold the tranny to the engine. Once the transmission has been installed, you can secure the slave cylinder back in its location. The drive train is now installed.
Share